How to Use GitHub Webhooks, Docker, and Python for Automatic End-to-End Deployments
An in-depth look into the process for automatically keeping your App up to date

(Image by Author, source here and here)
Table of Contents
1. Motivation
Section One: Context and Overview
2. Context
3. Other Methods
— 3.1. Manual Process
— — 3.1.1. Advantages
— — 3.1.2. Disadvantages
— 3.2 Docker Process
— — 3.2.1. Advantages
— — 3.2.2. Disadvantages
Section Two: Details About the App
4. The Automated Webhook is Method
5. Explanation of the Key Files
— 5.1. File: /requirements.txt
— 5.2. File: /docker/uvicorn.Dockerfile
— 5.3. File: /docker/docker-compose.yml
— — 5.3.1. The environment section
— — 5.3.2. The volumes section
— — 5.3.3. The ports section
— 5.4. File: /src/api/main.py
— — 5.4.1. Import Libraries
— — 5.4.2. Compile Variables
— — 5.4.3. Set Landing Page
— — 5.4.4. Instantiate App
— — 5.4.5. Set Custom Functions
— — 5.4.6. Set Custom Classes
— — 5.4.7. Define Endpoint: Landing Page
— — 5.4.8. Define Endpoint: Health Check
— — 5.4.9. Define Endpoint: Main Endpoint
— 5.5. File: /templates/landing_page.html
Section Three: How to Use the App
6. How to Use It
— 6.1. Create Server (using AWS)
— 6.1. Add docker-compose.yml file
— 6.1. Launch Docker on Server
— 6.1. Add Webhook on Git (using GitHub)
— 6.1. Test it
Section Four: More Info
7. What’s next
8. Where to Find More Information
9. The full file for: /src/api/main.py
10. Contact
1. Motivation
If you’re anything like me, you’re a curious creature. So, when I started learning about what Webhooks are, and how to use them, it felt like I was pulling at a loose thread on my tee shirt. The more I pulled, the more the world of Webhooks unraveled, the more I learnt, the more I understood, the more I unveiled about the mysterious world of API’s and Webhooks and Automation, and the more I wanted to learn more!
So, the motivation here is to create a streamlined and seamless way for doing deployments from GitHub to production servers. I feel like it is possible to write a simple Python App to do this. So let’s find out how!
This article will be split in to four sections, each outlining a different aspect of this process. Section Two is incredibly detailed, but I’ve tried to include as much description and screen shots as necessary, in order to make it easier to comprehend what is happening here. Section Three contains hands-on instructions for how to use the App. Enjoy!
Section One: Context and Overview
2. Context
I’ve been coding for a few years now, and I have quite a few Repo’s on GitHub (and GitLab, and a few others). And I see this button:
Repo* > Settings > Webhooks > Add webhook(Image by Author)
So, I read a bit about it on GitHub’s Webhooks Guide page, along with a few Blogs on how to set it up (like this one and this one). The way I understand it is like this:
When you set up Webhooks on a Repo, and you
committhenpushto the Repo, GitHub will automatically send a HTTPPOSTrequest to the URL you specify.
The payload for that request will contain the metadata for the event from GitHub, but will not contain the content from Repo itself. Therefore, the system that is receiving the Webhook request will then need to take some sort of action to pull or clone the latest data from the Repo.
This Webhook methodology is not exclusive to GitHub, but is also available on GitLab and BitBucket, and many other Git platforms.
3. Other Methods
First, it’s important to understand that there are many, many (many!) different ways to deploy apps in production environments. Let’s look at two other common methods:
3.1. Manual Process
The manual intervention process would look something like this:
- To do
git committhengit pushon Local PC to push to the Upstream Repo. - When ready to deploy, to manually
sshin to the target server. - To do
git clone(if for the first time) orgit pull(for subsequent updates) to fetch the latest code from the Repo to the Server.
Obviously there are lot of steps, and a lot of complexity in this manual process. However, I’ve kept it to just the high-level deployment steps, so that you can get the idea of the process.
3.1.1. Advantages:
— Easy to maintain
— Developer has full control
— No requirement/dependency on external tools or apps (eg. Docker)
3.1.2. Disadvantages:
— Requires time, effort, concentration by the Developer during deployment
— One wrong move, and mistakes can easily be made; and the Developer may not even realise it until much later
— Any dependencies (eg. Other apps, other libraries, etc), will need to be manually executed in addition to this Git process.
3.2. Docker Process
The Docker app streamlines this process a lot, and makes the life of the Developer a lot easier. The high-level process is:
- Run
docker buildanddocker runon Local PC to ensure the image/container is working correctly (this can be streamlined runningdocker compose up) - Publish the container using
docker loginthendocker pushto upload the container to the container repository (this can be AWS ECR or Azure ACR or Docker Hub, or any other container hosting platform) - Then to
sshon to the Server, and to dodocker pull, followed bydocker buildanddocker run(or just simplydocker compose up, assuming the compose file is correctly set up).
While it seems like there are more steps in this process, actually the process is a lot simpler. Because it’s not deploying through a Git Repository, but rather a Container Repository. Meaning to say that the container can be fully built and working on your Local PC, and when deploying to the Server it will work the exact same way.
3.2.1. Advantages:
— Docker will run on any system, exactly the same way; so it is very reliable
— All dependencies are already handled through Docker, therefore less effort/concentration/focus needed from the Developer
3.2.2. Disadvantages:
— The configuration setup can sometimes be a little confusing
— If the Developer is not familiar with Docker, the setup and debugging can take a little while to finish
Section Two: Details About the App
4. The Automated Webhook Method
It is very easy to Automate this process. The solution here is to create a very very simple Python App (using FastAPI) which will receive the HTTP POST request from Git, then call a Python script to then pull the latest update from the Git upstream Repo. It is very similar to the abovementioned manual process; wherein the developer will pull the latest code from the Repo. However, the difference here is that we will use the power of Python to automatically pull the latest code for us.
The end-to-end process will look like this:

(image by Author, source here and here)
To break it down step-by-step, this is what is happening:
- The developer will work on the App on their local PC
- The developer will push updates to the upstream Git repo (in this example, we use GitHub; but any other hosting platform can also work),
- The Git Repo will then trigger the Webhook process, and will send a HTTP
POSTrequest to a specified URL, - Behind that URL is an IP address, which should be hosted on a cloud computing platform (here, we use AWS, but any other cloud computing platform, like Azure, will also work),
- The Depending on if the Git repo uses HTTP or HTTPS, it will hit the Server on port
80(for HTTP) or port443(for HTTPS), - The server will then have it’s port
80and port443exposed to the public, to allow for network traffic to pass through. - Hosted on the server is a Docker container and the container will map the external ports
80and443to an internal port8880, which can then be consumed by the internal App, - Mounted within the Docker container is a FastAPI App which will listen to the port
8880and the Endpoint which is defined by the developer, - Once the HTTP
POSTmessage hits the endpoint URL, then the FastAPI App will call a Python script, - That Python script will then trigger a
git clone(orgit pull) process to fetch the latest code from the upstream repo, - Python will then save that info to a directory on Docker (in this instance, we’ll save it to the
/app/repodirectory, but this is configurable and you can save it anywhere), - Docker will then use a process called volume mapping to persist the data from that directory on the container to a directory outside the container (which means that as soon as the
/app/repodirectory on the container is updated, the/repodirectory outside the container will immediately also be updated), - Once the
/repodirectory is updated on the server-level, then it is possible to execute any other App as necessary.
To the astute eye, you will note here that it is actually possible to cluster multiple Docker containers together, so that one will run the App itself, instead of relying on the Server-level to run it. Yes, that’s right, and it’s also very common to do it like this. However, for simplicity, I have kept the process here to simply show the Webhook process from Git to the Server. Using this as a basis, it is then possible to add much more complexity on top.
5. Explanation of the Key Files
There are a number of key files that are used in this process. The next few sections will explain these files in detail.
5.1. File: /requirements.txt
The requirements are super simple. We only need three packages:
fastapi: For actually building the API endpointsgitpython: Forclone'ing/pull'ing from the upstream Repopython-decouple: For handling default environment variables
There will be some other libraries which will be imported at run-time; however, these will be part of the Python built-in’s, and not needed to be added to the requirements.txt file.
(image by Author, source here and here and here)
5.2. File: /docker/uvicorn.Dockerfile
Within the world of Docker, the Dockerfile is a ‘set of instructions’ which should be executed on a particular container, in order to set it up for it’s operation. While there are many, many (many!), different options and configurations available, here we have kept things quite simple.
The specific steps are:
- Use the base image as
tiangolo/uvicorn-gunicorn-fastapi, which contains all the source infrastructure needed for establishing and running a server for successfully running FastAPI. - Copy the
requirements.txtfile from the local environment on to the container. - Running three different PIP statements to:
1. Upgradepip, in case it is outdated,
2. Install the packages from therequirements.txtfile,
3. Upgrade theuvicornpackage, in case it is outdated. - Copy all the required files from the
srcand thetemplatesdirectories from local environment on to the container. - Set the working directory in to the
/appdirectory within the container. - Set the command line, which will be executed once the container is finished being built, and is ready to be run.
(image by Author, source here and here and here)
The final line (the CMD one) is quite interesting. Let me point out a few important bits of information:
- It is going to execute the
uvicornapplication, which is effectively a server for handling the FastAPI processes and commands - It will execute the application which is called
app, found within themain.pymodule. - The
main.pymodule is actually within a sub-directory on the container, to be found within the/src/apidirectory. - It is hosted to monitor the IP address:
0.0.0.0. Which is effectively saying ‘monitor the localhost’. This is because the Server IP address is used by the external systems (via the URL), but the signal is within the server itself, it will be found on the localhost IP. So, therefore, Uvicorn only needs to monitor the localhost within the server itself. - The system will monitor port
8880, which is why it’s important to map the external ports to the internal ports (which will be covered in the next section, about thedocker-compose.ymlfile). - The root-path of the application is on the current folder (denoted with the
"."syntax). - The output from the application will be printed to the terminal to use some pretty colours; which is helpful for reading the log files and messages at a later time.
5.3. File: /docker/docker-compose.yml
After the Dockerfile, the docker-compose.yml file is the logical next step, which will take the process further again. It can be used to create clusters of containers, each of which can be set to work in unison and depending off one another. While this is an amazing functionality, it is not needed for our purposes here. In this instance, we will only require one container, which will be built using the Dockerfile as defined above. The reason why we use the docker-compose.yml methodology is because it is convenient; it allows for easy addition of environment variables and volume mappings.
/docker/docker-compose.yml(image by Author, source here and here and here)
Note here that this is a SAMPLE file for the docker-compose.yml. The Git URL from which this is pulling data is not actually an application (merely a collection of code snippets). So, this is merely showing the process how of to set up the application.
5.3.1. The environment section:
There are 9 values that could/should be included in the environment section, including:
GIT_URL(Mandatory): The URL from which the Repo will be cloned.API_ENDPOINT(Optional, with default/api/webhook): The Endpoint which will be called by the Webhook.REPO_DIR(Mandatory): The DIR to which the Repo will be cloned.VERSION(Optional, with default0.0.1): The version number for the app.TITLE(Optional, with defaultUpdate from Git): The title of the app.DESCRIPTION(Optional, with defaultAutomated process for pulling from Git repo upon webhook call.): The description of the app.CONTACT_NAME(Optional, with defaultNone): The name of the person to contact about the app.CONTACT_URL(Optional, with defaultNone): The website for the contact person.CONTACT_EMAIL(Optional, with defaultNone): The email for the contact person.
See here for more details.
5.3.2. The volumes section:
In order to utilise storage processes between the parent container (ie. the Server) and the Docker container, the volumes section is the mechanism designed to achieve persistence between the two environments. Effectively, the value on the left-hand-side of the colon (:) is the directory location on the parent container, and the value on the right-hand-side is the directory location on the Docker container itself. By doing so, any changes whatsoever to either directory will instantaneously update the other.
Default values:
- ../repo:/app/repo5.3.3. The ports section:
The port mappings are important to ensure that the external Ports can be correctly mapped to the internal processes within Docker. Since port 80 is for HTTP, and port 443 is for HTTPS processes, it is reasonable to expect any upstream Git process to utilise either one of these. And since the FastAPI app is listening to port 8880, it is logical to map these two external ports (80 and 443) to the internal 8880 port. The mapping for 8880:8880 is likely redundant on the Server, but included here because it is necessary for doing testing on Local PC.
For ease of reference, the value on the left-hand-side of the colon (:) is the external port, and the value on the right-hand-side is the internal port.
Default values:
- 8880:8880
- 443:8880
- 80:8880
5.4. File: /src/api/main.py
Due to the size of the file, I have broken it in to chunks and explained each section individually. The full file is copied to the end of this article (see here).
5.4.1. Import Libraries
First thing to do is to import the required libraries. The way that this is structured is to not import the full code base from each library; but instead to only import the required functions/classes from each.
More specifically:
exec_infofor handling errors and returning them back through the APIconfigfor handling the default environment variablesFastAPIandQueryfor running the API endpointsBaseModelas a pedantic (or, ‘pydantic’ 😂) method for handling objects through the API endpointsPlainTextResponse,JSONResponse, andHTMLResponseare the specific objects which will be returned by the FastAPI endpointsRepofor actually calling thegit cloneandgit pullmethodsexistsfor checking whether the/repofolder exists or not- And finally,
rmtreefor physically deleting the data in the/repobefore executing thegitprocesses.
/src/api/main.py (lines: 19–27)(image by Author, source here and here and here)
5.4.2. Compile Variables
As mentioned above, there are 9 environment variables used in this process. Two of which are Mandatory, and the rest are Optional. The way that these mandatory and optional processes are handled are set up using the config() function of the python-decouple package. Effectively, this will allow the developer to define a default value for the Environment variable, and to cast whatever value is parsed in to the desired data type.
/src/api/main.py (lines: 30–45)(image by Author, source here and here and here)
5.4.3. Set Landing Page
The landing page is incredibly simple. It’s just a basic HTML table, which allows the Developer (and indeed any other user) to see the key environment variables directly on the Landing page for the app. The template which is loaded will be further outlined below in this paragraph. The process to physically import it in to the Python environment is actually quite simple, as shown below. Moreover, the str.format() method is utilised to parse the specific Environment variables directly in to the HTML string. Computationally speaking, this is very efficient.
/src/api/main.py (lines: 48-61)(image by Author, source here and here and here)
5.4.4. Instantiate App
Once all packages are loaded and constants defined, it’s time to instantiate the App. The FastAPI package has a suite of very intuitive, very simple, and very useful processes. Most of the default values are perfectly usable, which eliminates a lot of the complexity (and, indeed, ambiguity) on behalf of the developer. In just a few lines of code, the entire FastAPI application can be defined and is ready to use. As shown below
The only aspect which needs to be elaborated upon is the openapi_tags section. This is an aesthetic choice, so that when the /swagger page is loaded, it is very easy to see which API endpoints are grouped together in to which sections. This is another entirely optional (yet highly advised) configuration to use.
/src/api/main.py (lines: 64-76)(image by Author, source here and here and here)
5.4.5. Set Custom Functions
While I’ve reserved a section for crafting some custom functions, actually there’s only really one which I’ve added in here. It’s a helper function which is used for removing all the files from within a directory. This is necessary because sometimes the gitpython package does not like to clone a repo in to a directory when there is already other data and files existing in the same location. So, this function will readily remove the outdated files.
/src/api/main.py (lines: 85-89)(image by Author, source here and here and here)
5.4.6. Set Custom Classes
The FastAPI package relies on the helpful processes contained within the BaseModel class of the pydantic package. By using this class, it is incredibly easy to define request and response objects to be used by the API. More details can be found here. For our purposes here, I’ve only defined three custom classes, and the structure of them is very simple and straightforward.
/src/api/main.py (lines: 97-110)(image by Author, source here and here and here)
5.4.7. Define Endpoint: Landing Page
Now that everything is set up and ready to go, it’s time to define the actual endpoints. Here, we will use three specific endpoints; the first of which is the Landing page. Each of these endpoints will utilise FastAPI’s decorator methodology, specifically the @app.get() or the @app.post() methods.
For this first Endpoint, we know that this is the landing page because we have defined path="/", which basically means that this will be the root directory for this website. Everything else will be built on top of this root directory. It is a very simple endpoint which returns a HTMLResponse class, which contains the LANDING_PAGE which we have defined earlier. Also, the schema for this endpoint is turned off, so that when the /swagger page is inspected, the reader is not seeing unnecessary and redundant schema definitions.
The code looks like this 👇
/src/api/main.py (lines: 118-134)(image by Author, source here and here and here)
When it’s running, the Swagger page looks like this 👇
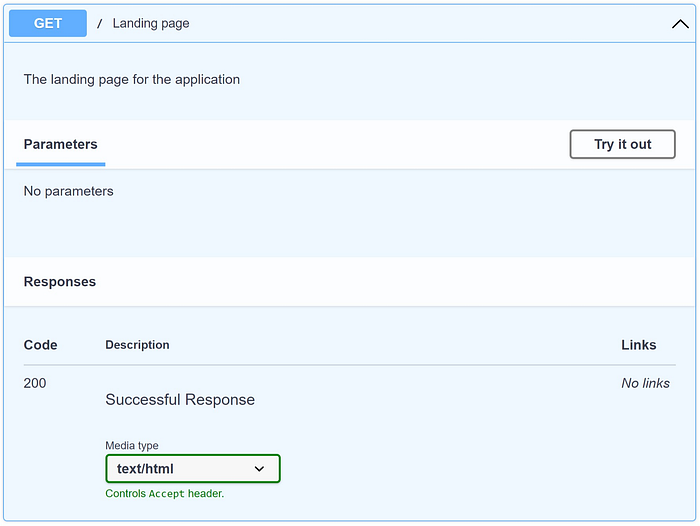
The Swagger page for the Landing Page Endpoint(image by Author)
When it’s running, the URL looks like this 👇
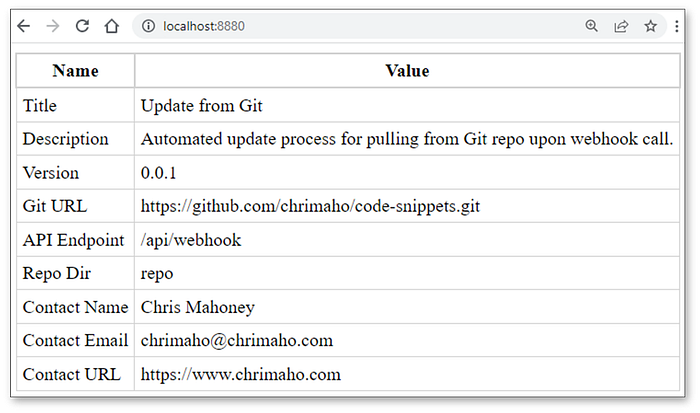
The URL page for the Landing Page Endpoint(image by Author)
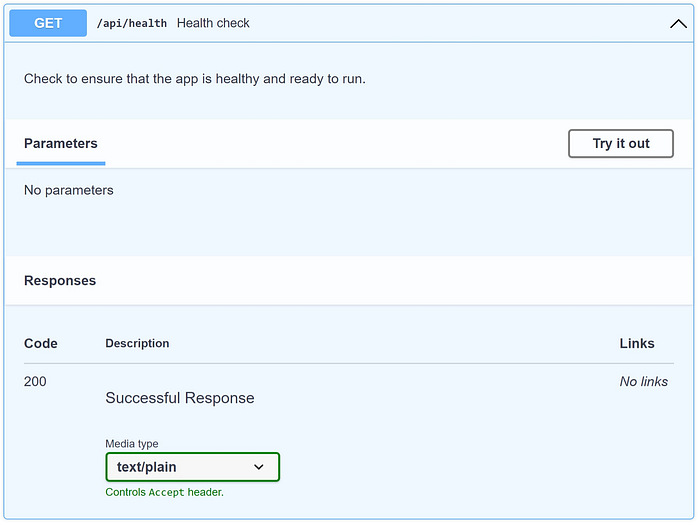
5.4.8. Define Endpoint: Health Check
The second API Endpoint to declare is a health check. This is important so that the user is able to know if the entire application is up and running, and is returning a healthy response. It is best practice to set up a single endpoint for this purpose.
The structure of this endpoint is just as simple as the Landing Page. Perhaps even more simple, because it returns a PlainTextResponse instead, which is only going to return a short string of text.
The code looks like this:
/src/api/main.py (lines: 137-153)(image by Author, source here and here and here)
When it’s running, the Swagger page looks like this:
The Swagger page for the Health Check Endpoint(image by Author)
When it’s running, the URL looks like this:
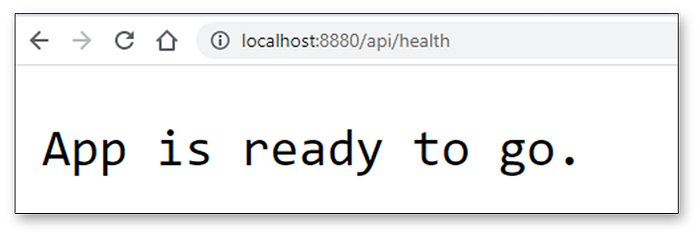
The URL page for the Health Check Endpoint(image by Author)
5.4.9. Define Endpoint: Main Endpoint
And finally, we reach the Main Endpoint. This is where the main magic happens. While this Endpoint looks long, it’s really not. This code chunk can be broken in to three parts:
- The decorator part:
— This is the section that actually defines that it is a HTTPPOSTmethod.
— Thepathis a parameter, as defined by the user in theAPI_ENDPOINTpart of theenvironmentvariables.
— Thedescriptionis split over three lines (mainly so I can make it look aesthetically pleasing on the screen 😉), and it also includes the specificGIT_URLandREPO_DIR, as defined by the user also in theenvironmentvariables.
— It will always return a JSON object.
— Depending on how the data is parsed to this API Endpoint, it will either return one of three statuses:200for Success,422for Validation Error, or500for when there is an Internal Server Error. These are the three custom classes that we defined above. - The declaration part:
— This section is only two parameters: thegit_urlfor where the data is being pulled from, and therepo_dirfor where the data will be saved to.
— Under the hood, each of them will be aQueryobjects.
— The only look long because thedescriptionpart covers multiple lines. - The function execution part
— The actual code execution part is going totryto to two things: 1) Check the target directory (and delete anything that exists in there, if necessary), and 2) Clone the latest data from the upstream repo.
— If it meets an error, it will return aInternalServerErrorresponse to the caller through the API so they can see and debug the error if necessary.
— If it is successful, then it will return aSuccessresponse back to the caller.
The code looks like this:
/src/api/main.py (lines: 156-205)(image by Author, source here and here and here)
When it’s running, the Swagger page looks like this 👇
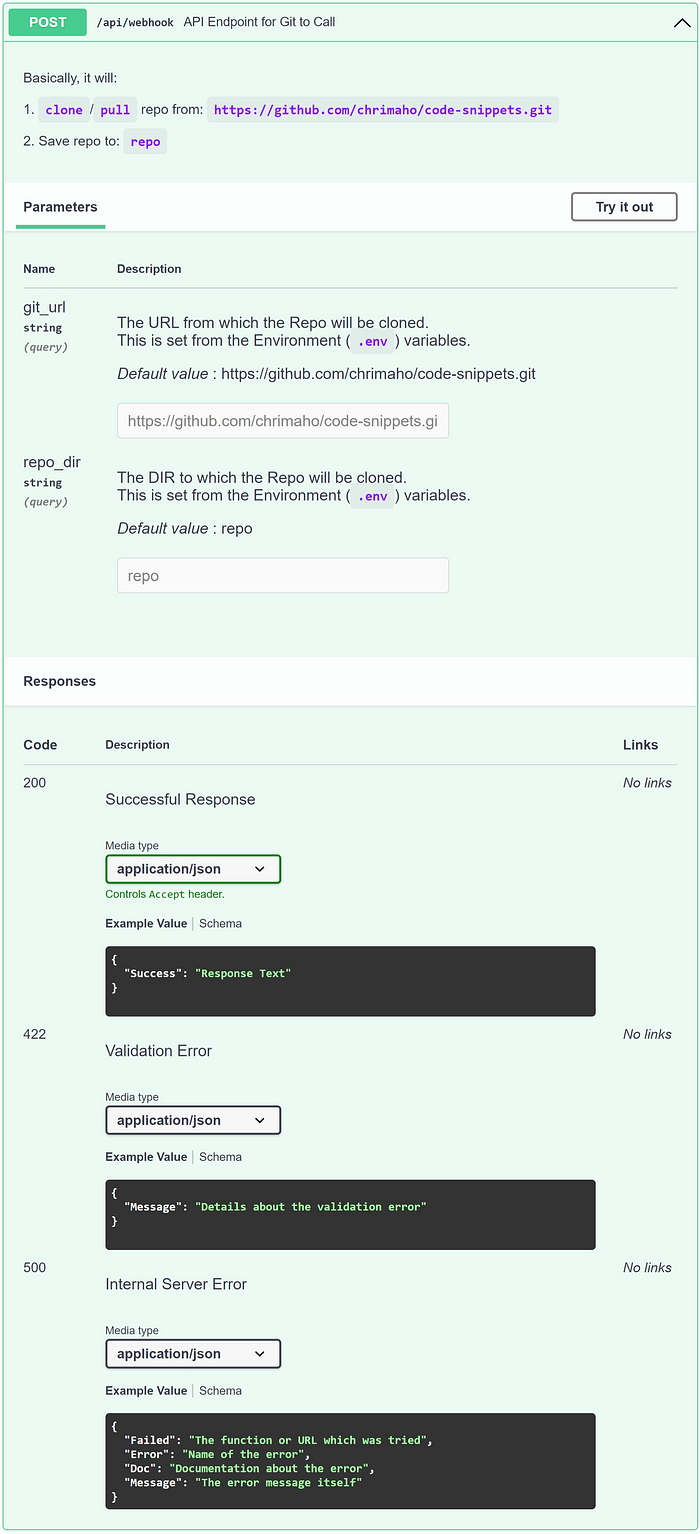
The Swagger page for the Main Endpoint(image by Author)
5.5. File: /templates/landing_page.html
As mentioned above, I’ve written a super simple HTML page which can be used for the Landing Page for the API. You’ll notice two perculiarities here:
- The values within the
<style>tag are not proper CSS syntax, as they have double-curly-brackets ({{,}}). This is because this info will be parse’d in to Python, which will then interpret anything within the curly brackets to be parameters, and attempt to assign variables to them. To escape this, the double-curly-bracket syntax is used. This process is defined in the Python documentation. - The values within the single-curly-brackets are the Global Constants, as defined by the environmental variable (see above).
/templates/landing_page.html(image by Author, source here and here and here)
Section Three: How to Use the App
6. How to Use It
Now that we have built the app, and we understand what all of the components are doing, it’s now time to set it up and begin using it.
6.1. Create Server (using AWS)
First thing’s first, it’s necessary to create the server in the cloud. It’s possible to use many different cloud-computing platforms; the two most popular ones are the Elastic Compute Cloud (aka EC2) on the Amazon Web Services (aka AWS) platform, and the Azure Virtual Machine (aka AVM) on the Microsoft Azure (aka Azure) platform. If you want to read about the differences between the two platforms, take a look at this article: Comparing AWS and Azure Compute Services.
For the purposes of this tutorial, we’re going to use the AWS EC2 platform. Here, there are many, many different tutorials about creating EC2 instances. Such as this one or this one or this one. I have personally found the articles by Jan Giacomelli to be the most helpful, because he includes plenty of details, explanations and screen shots. See tutorial: Deploying Django to AWS with Docker.
Please pay close attention to the step in this Tutorial to Install Docker on the server. To add to this, there are two other pages on Docker Docs to help guide you with this installation: Install Docker Engine on Ubuntu and Install Docker Compose V2 on Linux. Once you ssh in to the server, the specific set of instructions which you will need to run are:
Install Docker and Docker Compose on EC2 Instance(image by Author, source here and here and here)
Once you have created the EC2 instance and have it up and running successfully, it’s important to add one extra step. That is to whitelist the IP addresses from GitHub, so that when GitHub will trigger the HTTP POST request against your EC2 instance, it will not be blocked by the networking rules which are set up by default on the EC2. For more information about why this is important, see details on About GitHub’s IP Addresses and Possibility to Whitelist Webhooks IP addresses and GitHub Webhooks IP Ranges.
To whitelist these IP’s, follow the instructions given on this tutorial: Authorize Inbound Traffic for your EC2 Instances. Once you have done so, your Inbound Rules should look like this 👇
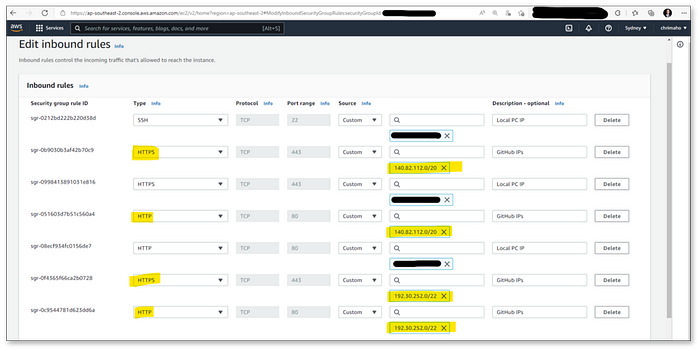
Inbound Rules required for GitHub to access EC2 Instance(image by Author)
You may ask the question: “But why do I even need to do this?” or maybe “How do I know it has worked?” or maybe “How do I know if GitHub is failing because the IP was not whitelisted?”. Well, the answer to all these questions is the same.
Specifically: if the GitHub IPs are not whitelisted, then when the Webhook is triggered from GitHub to AWS, it will be blocked and the error message which is returned will be: failed to connect to host. See below screen shot for an example:
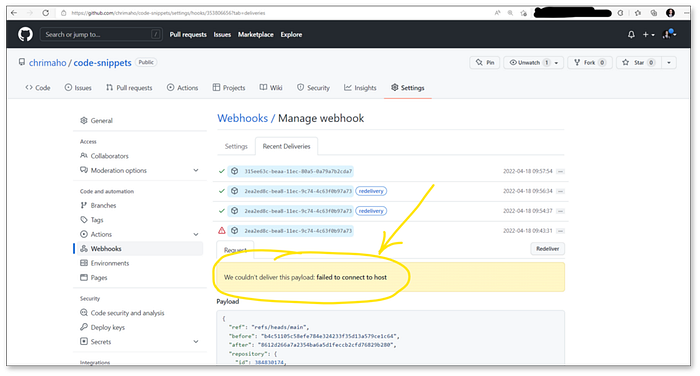
Error message received when IP Addresses are not correctly whitelisted(image by Author)
6.2. Add docker-compose.yml file to Server
Now that the EC2 instance is ready, the next steps is to add the docker-compose.yml file to it. For this, there are three methods for adding the file to the Server:
- Using
ssh:
— Follow the instructions here and here for how to log on to the EC2 instance usingssh.
— Once on the server, add an empty file using:touch docker-compose.yml.
— Open the file usingnano docker-compose.yml.
— Literally copy-and-paste the text from your Local PC in to the server directly.
— Save and close the file by pressingctrl+Othenctrl+X. - Using
scp:
— Follow the instructions here and here for how to execute anscpscript to push files to a secure server.
— The command should be something like:scp -i path/to/pem/file/ec2_identity_file.pem /path/on/localpc/docker-compose.yml username@server:path/on/server - Using FileZilla (or other similar FTP software):
— Follow the instructions here and here and here and here for how to push files to an EC2 instance using FileZilla.
The exact file which you should be copying to the server is given below. Make sure you update the <update> sections with your specific information.
Template for the docker-compose.yml file(image by Author, source here and here and here)
6.3. Launch Docker on Server
Now that everything is set up and ready to go, the next bit is easy. Just one line of code to fire up the Docker container and start the API listener 👇
Install Docker and Docker Compose on EC2 Instance(image by Author, source here and here and here)
And when you run it on the server, then this is what it looks like:
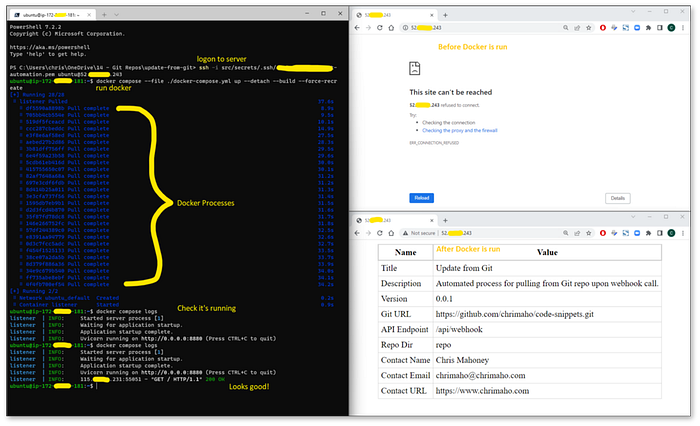
Script for setting up Docker on the EC2 Server(image by Author)
6.4. Add Webhook on Git (using GitHub)
Next, we need to actually configure GitHub to trigger the Webhook. The documentation provided by GitHub is actually really helpful with this, and it is quite easy to follow. In addition, there are some quite good Blogs and Tutorials available online for this, including: Deploy from Github/Gitlab to server using Webhook and Create your first CI/CD pipeline with Jenkins and GitHub.
In this example, I’ll use another Repo of mine called code-snippets. While it’s technically not an App, per se, it is still simple enough to help us to understand the process.
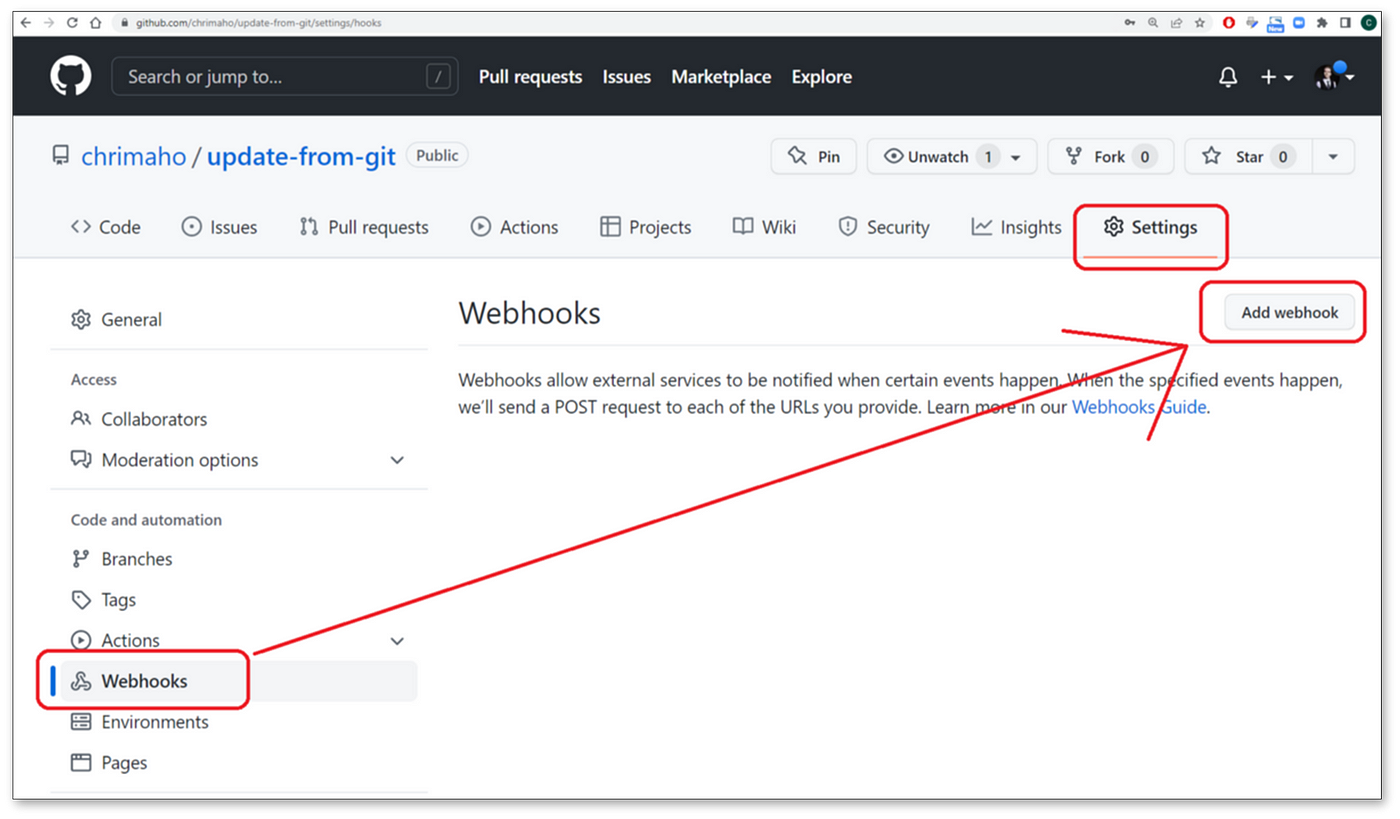
When we navigate to the Repo, we can then open the Settings then Webhooks section, then press the Add Webhook button. As shown below.
The URL for this is also quite simple: https://github.com/<username>/<repo>/settings/hooks.
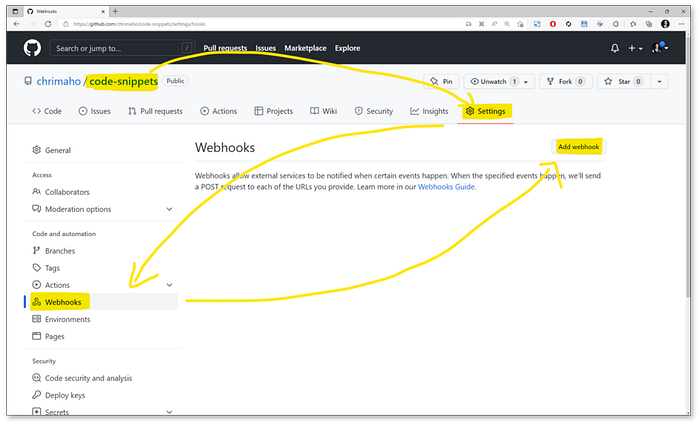
Where to find Webhooks on GitHub Repo(image by Author)
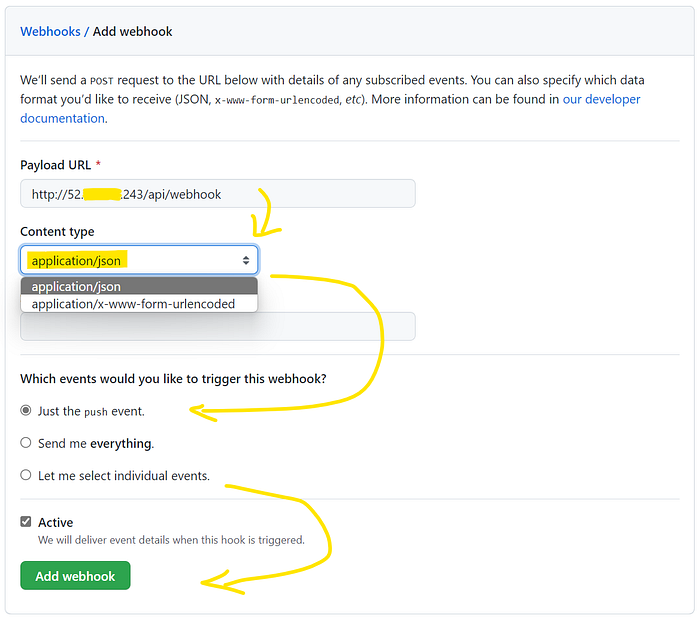
The next menu requires you to add the URL. This is the Elastic IP address which you had set in the EC2 Instance (see this section). If you know how to add sub-domains to your existing websites, then you can do that also. The part after the IP address is the same value which you had configured in the API_ENDPOINT value of the environment section of the docker-compose.yml file. It’s all starting to fall into place now.
For Content-Type, select application/json, leave the Events at just the push event, and then select Add Webhook.
Settings for adding a Webhook on GitHub(image by Author)
Once saved, you’ll see a message at the top of the screen:
Okay, that hook was successfully created. We sent a ping payload to test it out!
Successfully Created Webhook on GitHub Repo(image by Author)
And when you go in to that Webhook to inspect the Recent Deliveries, you’ll find one Request has already been sent, and a response already received. And, hopefully, if all of your configuration is successfully set up, you will see a green tick and a response status_code of: 200.

Confirmation of Successful response from GitHub Webhook ping(image by Author)
6.5. Test it
Testing it is super easy. First, let’s hop on to the EC2 server and check the docker compose logs are looking good. Then we will check the contents of the directory using ls repo. This is the result:
Checking the files on the Server(image by Author)
First thing’s first, you can see that the ping request from GitHub has come through successfully! And that the /repo directory is already containing the updated info from the upstream Git repo!
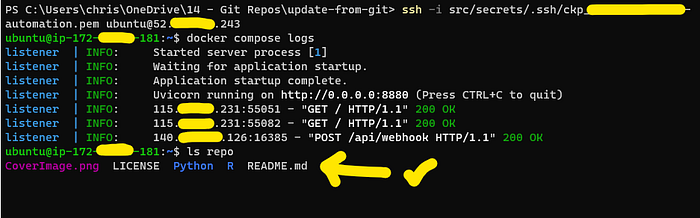
Next, on our local PC, within the directory for the repo that you want to push to GitHub, let’s just create one very small text file, called test.txt. Then we will do git add, git commit, git push to get it tot he upstream Repo. The code looks like this 👇
Add a new file to Git and Push to upstream Repo(image by Author, source here and here and here)
And the terminal looks like this:
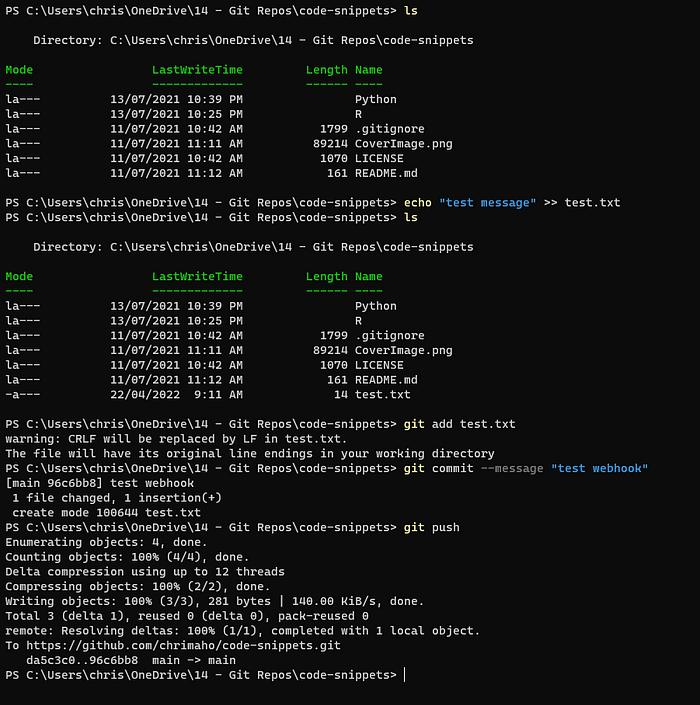
Add a new file to Git(image by Author)
And then when we go back to the EC2 server to check it, we can re-run docker compose logs to check it has come through successfully (which it has!), and also check the ls repo to confirm that the file is now existing (which it is!). This is what it looks like:
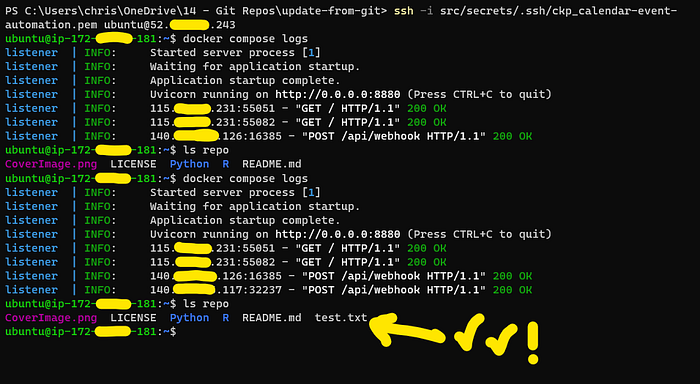
Re-Checking the files on the Server(image by Author)
Everything is now working like a charm!
Section Four: More Info
7. What’s Next
Note: Now that the Webhooks are set up and your Server is automatically being kept up to date, there is technically one more step which you would need to do. And that is usually to restart the app which you have running on the server, to ensure that it is always referencing latest source files. However, because various apps have various ways of being restarted, I am not going to mention them here.
Also, more recently, I’ve found that there is a Webhook process available for various Docker Container processes. Including on Docker Hub, AWS ECR, and Azure ACR. This is inspiration for me to do another blog for how to use this!
8. Where to Find More Information
Thankfully, this process is not difficult. I’ve set it up to be open source, and readily available. All source code is saved to GitHub, and the ready-to-use container is hosted on Docker Hub.
9. The full file for: /src/api/main.py
/src/api/main.py(image by Author, source here and here and here)
Thanks for reading.
Want to Connect?Shoot me queries,ideas and suggestions at https://chrimaho.com.

